Posts

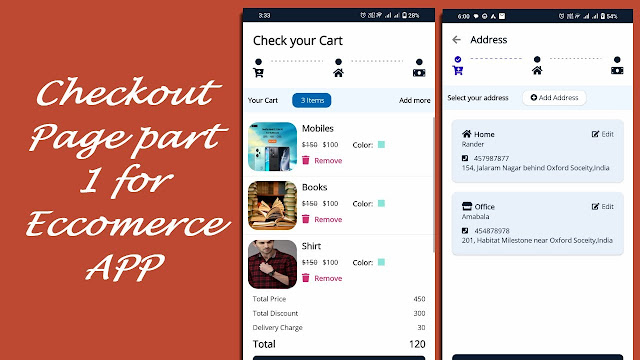
Ecommerce App - Checout Page Part 2

Image
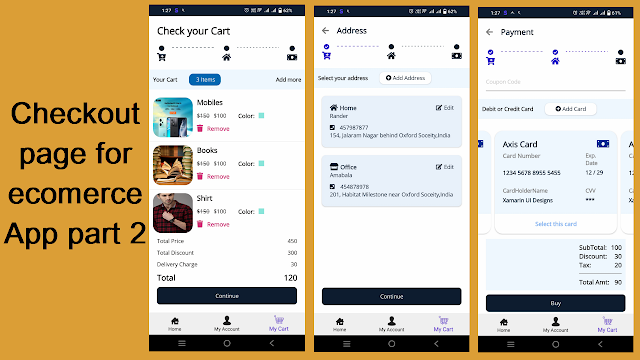
  Please, support my blog by clicking on our sponsors ad! For first part go to this link For fontawesome go to this link First create all required classes CardModel.cs public class CardModel : BaseViewModel { private Color borderColor; private bool isSelected; public string Name { get; set; } public string Number { get; set; } public string ExpDate { get; set; } public string CardHolderName { get; set; } public string CVV { get; set; } public string Type { get; set; } public string TypeIcon { get; set; } public bool IsSelected { get { return isSelected; } set { isSelected = value; OnPropertyChanged(nameof(IsSelected)); OnPropertyChanged(nameof(BorderColor)); } } public Color BorderColor { get {

MVVM MAUI Ecommerce APP Address Entry Form

Image
  Create a Address Entry Form in xamarin Please, support my blog by clicking on our sponsors ad! Watch video to understand code. For fontawesome refer this   link Lets create all Controls ImageLabel.xaml <ContentView xmlns="http://schemas.microsoft.com/dotnet/2021/maui" xmlns:x="http://schemas.microsoft.com/winfx/2009/xaml" x:Class="Ecommerce.UI.Template.CustomControls.ImageLabel"> <Grid RowDefinitions="Auto,Auto"> <Label x:Name="lblIcon" FontFamily="{x:DynamicResource FontAwesomeFamily}" HorizontalOptions="Center" TextColor="Gray" Grid.Column="0" Grid.Row="0"></Label> <Label x:Name="lbl" Grid.Column="0" Grid.Row="1" HorizontalOptions="FillAndExpand" HorizontalTextAlignment="Center" TextColor="Gray"></Label>

MVVM and MAUI - Checkout page for Ecommerce APP

Image
MVVM and MAUI - Checkout page for Ecommerce APP Please, support my blog by clicking on our sponsors ad! Watch this video to understand code. For fontawesome refer this   link First We will create all template CheckoutStepTemplate.xaml <ContentView xmlns="http://schemas.microsoft.com/dotnet/2021/maui" xmlns:x="http://schemas.microsoft.com/winfx/2009/xaml" x:Class="Ecommerce.UI.Template.Pages.CheckOut.Template.CheckoutStepTemplate" xmlns:fontawesome="clr-namespace:Ecommerce.UI.Template.Models"> <Grid x:Name="grid" ColumnDefinitions="Auto,*,Auto,*,Auto" HorizontalOptions="FillAndExpand" VerticalOptions="FillAndExpand"> <StackLayout Grid.Column="0" Spacing="5" > <Label x:Name="lblCartCircle" Text="{x:Static fontawesome:Solid.Circle}" HorizontalOpt

Product List and View Page for Ecommerce App

Image
Product list and view page for ecommerce App Please, support my blog by clicking on our sponsors ad! Let's create template for product list and view product For fontawesome refer this link Please watch this video to understand the code BackNavigation.xaml <ContentView xmlns="http://schemas.microsoft.com/dotnet/2021/maui" xmlns:x="http://schemas.microsoft.com/winfx/2009/xaml" x:Class="Ecommerce.UI.Template.CustomControls.BackNavigation" xmlns:fontawesome="clr-namespace:Ecommerce.UI.Template.Models"> <StackLayout Spacing="20" Grid.Row="0" Orientation="Horizontal"> <Label Text="{x:Static fontawesome:Solid.Arrow_Left}" FontSize="20" VerticalOptions="Center" FontFamily="FontAwesomeFreeSolid" TextColor="Gray"> <Label.GestureRecognizers> <TapGestur

Category List Page for Ecommerce App in MAUI

Image
  Category List Page for Ecommerce App In MAUI Please, support my blog by clicking on our sponsors ad! You can also see other ecommerce page : Authentication Page , Dashboard Please refer  Authentication Page  for resource. This code is explain in below video, please like share and subscribe   First we create categorymodel and categoryviewmodel public class CategoryViewModel { public ImageSource Img { get; set; } public string Title { get; set; } public string Description { get; set; } = "All Stock available"; } public class CategoryModel { public List<CategoryViewModel> GetCategory() { List<CategoryViewModel> list = new List<CategoryViewModel>(); list.Add(new CategoryViewModel { Img = "https://i.gadgets360cdn.com/products/large/redmi-note-11t-5g-824x800-1638256477.jpg", Title = "Mobiles" }); list.Add(new CategoryViewModel { Img

Dashboard Page In Ecommerce App in xamarin and MAUI app

Image
In Previous Blog , we created Authentication page for Ecommerce APP, now let's continue with Home Page, It will open when user click on login button of login page. To understand briefly watch this video: To create Home UI Page we will create Template and Class Templates BrandTemplate CardCircleImage FeatureProduct LargeImage Classes ViewModel classes are for property and model Classes for  Get List. ProductViewModel  ProductModel  BrandViewModel BrandModel Please, support my blog by clicking on our sponsors ad! Let's start by creating Template one by one. BrandTemplate <ContentView xmlns="http://schemas.microsoft.com/dotnet/2021/maui" xmlns:x="http://schemas.microsoft.com/winfx/2009/xaml" x:Class="Ecommerce.UI.Template.CustomControls.BrandTemplate"> <StackLayout Padding="10"> <Image Source="{Binding Img}" HeightRequest="120" WidthRequest="