Building User Authentication Interfaces in .NET MAUI: Login, Register, OTP Verification, and Forgot Password
In this blog post, we will explore how to create user authentication interfaces using .NET MAUI (Multi-platform App UI), a framework for building cross-platform applications. We will focus on four essential screens: Login, Register, OTP Verification, and Forgot Password. By the end of this tutorial, you will have a solid foundation for creating secure and user-friendly authentication flows in your .NET MAUI applications.
Prerequisites:
To follow along with this tutorial, you should have a basic understanding of .NET MAUI and C#. You will also need the .NET MAUI development environment set up on your machine.
Before starting with the UI first install nugget "CommunityToolkit.Maui" in your MAUI project.
Then initialize in MauiProgram.cs file
    public static MauiApp CreateMauiApp()
    {
        var builder = MauiApp.CreateBuilder();
        builder
            .UseMauiCommunityToolkit()
            .UseMauiApp<App>()
            .ConfigureFonts(fonts =>
            {
                fonts.AddFont("OpenSans-Regular.ttf", "OpenSansRegular");
                fonts.AddFont("OpenSans-Semibold.ttf", "OpenSansSemibold");
                fonts.AddFont("FontAwesome5FreeSolid900.otf", "FontAwesomeFreeSolid");
            });
        Microsoft.Maui.Handlers.EntryHandler.Mapper.AppendToMapping(nameof(Entry), (handler, view) =>
        {
#if ANDROID
            handler.PlatformView.SetBackgroundColor(Android.Graphics.Color.Transparent);
#elif IOS
            handler.PlatformView.BackgroundColor = UIKit.UIColor.Clear;
            handler.PlatformView.BorderStyle = UIKit.UITextBorderStyle.None;
#endif
        });

#if DEBUG
        builder.Logging.AddDebug();
#endif

        return builder.Build();
    }
Add some resource in resourcedictionary tag in app.xaml
    <Application.Resources>
        <ResourceDictionary>
            <ResourceDictionary.MergedDictionaries>
                <ResourceDictionary Source="Resources/Styles/Colors.xaml" />
                <ResourceDictionary Source="Resources/Styles/Styles.xaml" />
            </ResourceDictionary.MergedDictionaries>
            <Color x:Key="Primary">#0D1C2E</Color>
            <Color x:Key="PlaceholderColor">#E5E5E5</Color>
            <Color x:Key="GrayColor">#ABB0B3</Color>
            <Color x:Key="Secondary">white</Color>
            <x:Double x:Key="FiftyFontSize">50</x:Double>
            <x:String x:Key="FontAwesomeFamily">FontAwesomeFreeSolid</x:String>
        </ResourceDictionary>
    </Application.Resources>
HeaderTexbox - Custom Control
    <ContentView xmlns="http://schemas.microsoft.com/dotnet/2021/maui"
             xmlns:x="http://schemas.microsoft.com/winfx/2009/xaml"
             x:Class="Ecommerce.UI.Template.CustomControls.HeaderTextbox">
    <Grid HorizontalOptions="FillAndExpand" >
        <Border Grid.Row="0" HeightRequest="60" Stroke="{x:StaticResource GrayColor}"
        StrokeThickness="1"
        StrokeShape="RoundRectangle 10"
        Background="white"
        Padding="16,8"
        HorizontalOptions="FillAndExpand">


            <Entry x:Name="txt" PlaceholderColor="{x:StaticResource GrayColor}" TextColor="{x:StaticResource Primary}" FontSize="15" />
        </Border>
        <Label Grid.Row="0" x:Name="lbl" Margin="20,0,0,60" HorizontalOptions="Start" BackgroundColor="White" TextColor="{x:StaticResource GrayColor}"></Label>

    </Grid>
</ContentView>
public partial class HeaderTextbox : ContentView
{
    public HeaderTextbox()
    {
        InitializeComponent();
    }
    public string PlaceholderText
    {
        get => txt.Placeholder;
        set => txt.Placeholder = value;
    }

    public string Text
    {
        get => txt.Text;
        set => txt.Text = value;
    }

    public Double FontSize
    {
        get => txt.FontSize;
        set => txt.FontSize = value;
    }

    public Keyboard KeyBoard
    {
        get => txt.Keyboard;
        set => txt.Keyboard = value;
    }

    public int MaxLength
    {
        get => txt.MaxLength;
        set => txt.MaxLength = value;
    }

    public string Header
    {
        get => lbl.Text;
        set => lbl.Text = (string.IsNullOrEmpty(value)) ? "" : " " + value + " ";
    }

    public bool IsPassword
    {
        get => txt.IsPassword;
        set => txt.IsPassword = value;
    }
}
Login UI:
  <ContentPage xmlns="http://schemas.microsoft.com/dotnet/2021/maui"
             xmlns:x="http://schemas.microsoft.com/winfx/2009/xaml"
             x:Class="Ecommerce.UI.Template.Pages.Login"
             xmlns:controls="clr-namespace:Ecommerce.UI.Template.CustomControls"
             xmlns:mct="clr-namespace:CommunityToolkit.Maui.Behaviors;assembly=CommunityToolkit.Maui"
             Title="Login"
             BackgroundColor="White"
             NavigationPage.HasNavigationBar="False">
    <ContentPage.Behaviors>
        <mct:StatusBarBehavior StatusBarColor="{x:StaticResource Primary}" />
    </ContentPage.Behaviors>

    <Grid VerticalOptions="FillAndExpand" HorizontalOptions="FillAndExpand"
          RowDefinitions="230,*" ColumnDefinitions="*">
        <Image Grid.Row="0" Source="loginbg.png" Aspect="Fill" HorizontalOptions="FillAndExpand" VerticalOptions="FillAndExpand"/>
        <Label Grid.Row="0" VerticalOptions="EndAndExpand" Text="Login to your account"  Margin="20,0,0,45" TextColor="White" FontSize="{x:StaticResource FiftyFontSize}"></Label>
        <Label Grid.Row="0" VerticalOptions="EndAndExpand" Margin="20,0,0,25" Text="Login to your account" TextColor="White" FontSize="15"></Label>
        <Grid Grid.Row="1" Padding="20" VerticalOptions="FillAndExpand"  HorizontalOptions="FillAndExpand"  ColumnDefinitions="*" RowDefinitions="Auto,Auto,Auto,Auto,Auto">
            <controls:HeaderTextbox Grid.Row="0" HorizontalOptions="FillAndExpand" Header="Email"></controls:HeaderTextbox>
            <controls:HeaderTextbox Grid.Row="1" Header="Password" IsPassword="true"></controls:HeaderTextbox>
            <Label Text="Forget Password?" Grid.Row="2" Margin="0,10" FontAttributes="Bold" HorizontalOptions="EndAndExpand" TextColor="{x:StaticResource Primary}" HorizontalTextAlignment="End">
                <Label.GestureRecognizers>
                    <TapGestureRecognizer Tapped="TapGestureRecognizer_Tapped_1"></TapGestureRecognizer>
                </Label.GestureRecognizers>
            </Label>
            <Button Text="Login" Grid.Row="3" CornerRadius="10" HeightRequest="60" BackgroundColor="{x:StaticResource Primary}" FontSize="20" ></Button>
            <Label FontAttributes="Bold" Grid.Row="4" Margin="0,10"  HorizontalOptions="EndAndExpand" HorizontalTextAlignment="End" >
                <Label.FormattedText>
                    <FormattedString>
                        <Span TextColor="{x:StaticResource GrayColor}" Text="Don't have an account?"></Span>
                        <Span TextColor="{x:StaticResource Primary}" Text=" Register"></Span>
                    </FormattedString>
                </Label.FormattedText>
                <Label.GestureRecognizers>
                    <TapGestureRecognizer Tapped="TapGestureRecognizer_Tapped"></TapGestureRecognizer>
                </Label.GestureRecognizers>
            </Label>
        </Grid>
    </Grid>
</ContentPage> public partial class Login : ContentPage
{
public Login()
{
InitializeComponent();
}
private async void TapGestureRecognizer_Tapped(object sender, TappedEventArgs e)
{
try
{
await Navigation.PushAsync(new Register());
}
catch (Exception ex)
{
await DisplayAlert("Ecommerce", ex.Message, "OK");
}
}
private async void TapGestureRecognizer_Tapped_1(object sender, TappedEventArgs e)
{
try
{
await Navigation.PushAsync(new ForgotPassword());
}
catch (Exception ex)
{
await DisplayAlert("Ecommerce", ex.Message, "OK");
}
}
} <ContentPage xmlns="http://schemas.microsoft.com/dotnet/2021/maui"
xmlns:x="http://schemas.microsoft.com/winfx/2009/xaml"
x:Class="Ecommerce.UI.Template.Pages.Register"
xmlns:controls="clr-namespace:Ecommerce.UI.Template.CustomControls"
xmlns:mct="clr-namespace:CommunityToolkit.Maui.Behaviors;assembly=CommunityToolkit.Maui"
Title="Register"
BackgroundColor="White"
NavigationPage.HasNavigationBar="False">
<ContentPage.Behaviors>
<mct:StatusBarBehavior StatusBarColor="{x:StaticResource Primary}" />
</ContentPage.Behaviors>
<Grid VerticalOptions="FillAndExpand" HorizontalOptions="FillAndExpand"
RowDefinitions="230,*" ColumnDefinitions="*">
<Image Grid.Row="0" Source="loginbg.png" Aspect="Fill" HorizontalOptions="FillAndExpand" VerticalOptions="FillAndExpand"/>
<Label Grid.Row="0" VerticalOptions="EndAndExpand" Text="Register" Margin="20,0,0,45" TextColor="White" FontSize="{x:StaticResource FiftyFontSize}"></Label>
<Label Grid.Row="0" VerticalOptions="EndAndExpand" Margin="20,0,0,25" Text="Create your account" TextColor="White" FontSize="15"></Label>
<Grid Grid.Row="1" Padding="20" VerticalOptions="FillAndExpand" HorizontalOptions="FillAndExpand" ColumnDefinitions="*" RowDefinitions="Auto,Auto,Auto,Auto,Auto,Auto">
<controls:HeaderTextbox Grid.Row="0" Grid.Column="0" HorizontalOptions="FillAndExpand" Header="Full Name"></controls:HeaderTextbox>
<controls:HeaderTextbox Grid.Row="1" HorizontalOptions="FillAndExpand" Header="Email"></controls:HeaderTextbox>
<controls:HeaderTextbox Grid.Row="2" Header="Password" IsPassword="true"></controls:HeaderTextbox>
<controls:HeaderTextbox Grid.Row="3" Header="Confirm Password" IsPassword="true"></controls:HeaderTextbox>
<Button x:Name="btnRegister" Text="Register" Grid.Row="4" CornerRadius="10" HeightRequest="60" Clicked="btnRegister_Clicked" BackgroundColor="{x:StaticResource Primary}" FontSize="20" ></Button>
<Label FontAttributes="Bold" Grid.Row="5" Margin="0,10" HorizontalOptions="EndAndExpand" HorizontalTextAlignment="End" >
<Label.FormattedText>
<FormattedString>
<Span TextColor="{x:StaticResource GrayColor}" Text="Already have account?"></Span>
<Span TextColor="{x:StaticResource Primary}" Text=" Login"></Span>
</FormattedString>
</Label.FormattedText>
<Label.GestureRecognizers>
<TapGestureRecognizer Tapped="TapGestureRecognizer_Tapped"></TapGestureRecognizer>
</Label.GestureRecognizers>
</Label>
</Grid>
</Grid>
</ContentPage> public partial class Register : ContentPage
{
public Register()
{
InitializeComponent();
}
private async void TapGestureRecognizer_Tapped(object sender, TappedEventArgs e)
{
try
{
await Navigation.PopToRootAsync();
}
catch (Exception ex)
{
await DisplayAlert("Ecommerce", ex.Message, "OK");
}
}
private async void btnRegister_Clicked(object sender, EventArgs e)
{
try
{
await Navigation.PushAsync(new OTPVerification());
}
catch (Exception ex)
{
await DisplayAlert("Ecommerce", ex.Message, "OK");
}
}
} <ContentPage xmlns="http://schemas.microsoft.com/dotnet/2021/maui"
xmlns:x="http://schemas.microsoft.com/winfx/2009/xaml"
x:Class="Ecommerce.UI.Template.Pages.OTPVerification"
xmlns:controls="clr-namespace:Ecommerce.UI.Template.CustomControls"
xmlns:mct="clr-namespace:CommunityToolkit.Maui.Behaviors;assembly=CommunityToolkit.Maui"
Title="OTP Verification"
BackgroundColor="White"
NavigationPage.HasNavigationBar="False">
<ContentPage.Behaviors>
<mct:StatusBarBehavior StatusBarColor="{x:StaticResource Primary}" />
</ContentPage.Behaviors>
<Grid VerticalOptions="FillAndExpand" HorizontalOptions="FillAndExpand"
RowDefinitions="230,*" ColumnDefinitions="*">
<Image Grid.Row="0" Source="loginbg.png" Aspect="Fill" HorizontalOptions="FillAndExpand" VerticalOptions="FillAndExpand"/>
<Label Grid.Row="0" VerticalOptions="EndAndExpand" Text="OTP Verification" Margin="20,0,0,45" TextColor="White" FontSize="{x:StaticResource FiftyFontSize}"></Label>
<Label Grid.Row="0" VerticalOptions="EndAndExpand" Margin="20,0,0,25" Text="Verification code has been send to your email." TextColor="White" FontSize="15"></Label>
<Grid Grid.Row="1" Padding="20" ColumnSpacing="20" VerticalOptions="FillAndExpand" HorizontalOptions="FillAndExpand" RowDefinitions="Auto,200" ColumnDefinitions="*,*,*,*">
<controls:HeaderTextbox Grid.Column="0" MaxLength="1" KeyBoard="Numeric" FontSize="20"></controls:HeaderTextbox>
<controls:HeaderTextbox Grid.Column="1" MaxLength="1" KeyBoard="Numeric" FontSize="20"></controls:HeaderTextbox>
<controls:HeaderTextbox Grid.Column="2" MaxLength="1" KeyBoard="Numeric" FontSize="20"></controls:HeaderTextbox>
<controls:HeaderTextbox Grid.Column="3" MaxLength="1" KeyBoard="Numeric" FontSize="20"></controls:HeaderTextbox>
<Button Text="Verify" Grid.Row="1" Grid.Column="0" Grid.ColumnSpan="4" CornerRadius="10" HeightRequest="60" BackgroundColor="{x:StaticResource Primary}" FontSize="20" ></Button>
</Grid>
</Grid>
</ContentPage> public partial class OTPVerification : ContentPage
{
public OTPVerification()
{
InitializeComponent();
}
private async void TapGestureRecognizer_Tapped(object sender, TappedEventArgs e)
{
try
{
await Navigation.PopToRootAsync();
}
catch (Exception ex)
{
await DisplayAlert("Ecommerce", ex.Message, "OK");
}
}
} <ContentPage xmlns="http://schemas.microsoft.com/dotnet/2021/maui"
xmlns:x="http://schemas.microsoft.com/winfx/2009/xaml"
x:Class="Ecommerce.UI.Template.Pages.ForgotPassword"
xmlns:controls="clr-namespace:Ecommerce.UI.Template.CustomControls"
xmlns:mct="clr-namespace:CommunityToolkit.Maui.Behaviors;assembly=CommunityToolkit.Maui"
Title="Login"
BackgroundColor="White"
NavigationPage.HasNavigationBar="False">
<ContentPage.Behaviors>
<mct:StatusBarBehavior StatusBarColor="{x:StaticResource Primary}" />
</ContentPage.Behaviors>
<Grid VerticalOptions="FillAndExpand" HorizontalOptions="FillAndExpand"
RowDefinitions="230,*" ColumnDefinitions="*">
<Image Grid.Row="0" Source="loginbg.png" Aspect="Fill" HorizontalOptions="FillAndExpand" VerticalOptions="FillAndExpand"/>
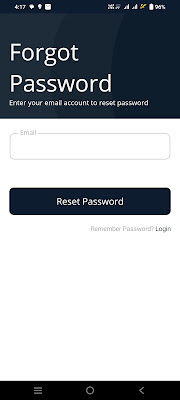
<Label Grid.Row="0" VerticalOptions="EndAndExpand" Text="Forgot Password" Margin="20,0,0,45" TextColor="White" FontSize="{x:StaticResource FiftyFontSize}"></Label>
<Label Grid.Row="0" VerticalOptions="EndAndExpand" Margin="20,0,0,25" Text="Enter your email account to reset password" TextColor="White" FontSize="15"></Label>
<Grid Grid.Row="1" Padding="20" VerticalOptions="FillAndExpand" RowSpacing="10" HorizontalOptions="FillAndExpand" ColumnDefinitions="*" RowDefinitions="Auto,100,Auto">
<controls:HeaderTextbox Grid.Row="0" HorizontalOptions="FillAndExpand" Header="Email"></controls:HeaderTextbox>
<Button Text="Reset Password" Grid.Row="1" CornerRadius="10" HeightRequest="60" VerticalOptions="End" BackgroundColor="{x:StaticResource Primary}" FontSize="20" ></Button>
<Label FontAttributes="Bold" Grid.Row="5" Margin="0,10" HorizontalOptions="EndAndExpand" HorizontalTextAlignment="End" >
<Label.FormattedText>
<FormattedString>
<Span TextColor="{x:StaticResource GrayColor}" Text="Remember Password?"></Span>
<Span TextColor="{x:StaticResource Primary}" Text=" Login"></Span>
</FormattedString>
</Label.FormattedText>
<Label.GestureRecognizers>
<TapGestureRecognizer Tapped="TapGestureRecognizer_Tapped"></TapGestureRecognizer>
</Label.GestureRecognizers>
</Label>
</Grid>
</Grid>
</ContentPage> public partial class ForgotPassword : ContentPage
{
public ForgotPassword()
{
InitializeComponent();
}
private async void TapGestureRecognizer_Tapped(object sender, EventArgs e)
{
try
{
await Navigation.PopToRootAsync();
}
catch (Exception ex)
{
await DisplayAlert("Ecommerce", ex.Message, "OK");
}
}
} 


I not able to bind email in text, getting error
ReplyDeleteUsing this control
ReplyDelete