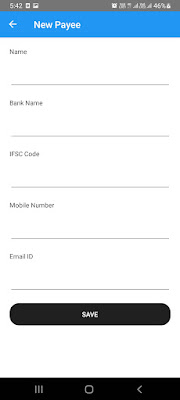
Form UI Design in xamarin form
Form UI Design in xamarin form
Below is the code. <ContentPage xmlns="http://xamarin.com/schemas/2014/forms"
xmlns:x="http://schemas.microsoft.com/winfx/2009/xaml"
xmlns:control="clr-namespace:OnlineBankingUIDesigns.Controls"
x:Class="OnlineBankingUIDesigns.Views.NewPayee"
Title="New Payee">
<ContentPage.Content>
<Grid HorizontalOptions="FillAndExpand" VerticalOptions="StartAndExpand" Padding="20" RowSpacing="20"
RowDefinitions="Auto,Auto,Auto,Auto,Auto,Auto,Auto,Auto,Auto,Auto">
<Label Grid.Row="0" Text="Name" HorizontalOptions="FillAndExpand" TextColor="#202020"></Label>
<Entry Grid.Row="1" HorizontalTextAlignment="Start" HeightRequest="50" />
<Label Grid.Row="2" Text="Bank Name" HorizontalOptions="FillAndExpand" TextColor="#202020"></Label>
<Entry Grid.Row="3" HorizontalTextAlignment="Start" HeightRequest="50" />
<Label Grid.Row="4" Text="IFSC Code" HorizontalOptions="FillAndExpand" TextColor="#202020"></Label>
<Entry Grid.Row="5" HorizontalTextAlignment="Start" HeightRequest="50" />
<Label Grid.Row="6" Text="Mobile Number" HorizontalOptions="FillAndExpand" TextColor="#202020"></Label>
<Entry Grid.Row="7" HorizontalTextAlignment="Start" HeightRequest="50" />
<Label Grid.Row="8" Text="Email ID" HorizontalOptions="FillAndExpand" TextColor="#202020"></Label>
<Entry Grid.Row="9" HorizontalTextAlignment="Start" HeightRequest="50" />
<Button Grid.Row="10" CornerRadius="20"
Text="Save" BackgroundColor="#202020" TextColor="White" ></Button>
</Grid>
</ContentPage.Content>
</ContentPage> Let take look for View Page.
I have create same View Page in two different way.
First UI is as below:
View Page in xamarin form
 <ContentPage xmlns="http://xamarin.com/schemas/2014/forms"
             xmlns:x="http://schemas.microsoft.com/winfx/2009/xaml"
             xmlns:control="clr-namespace:OnlineBankingUIDesigns.Controls"
             x:Class="OnlineBankingUIDesigns.Views.ConfirmDetail"
             Shell.NavBarIsVisible="False">
    <ContentPage.Content>
        <Grid HorizontalOptions="FillAndExpand" VerticalOptions="FillAndExpand" Padding="20"
              RowDefinitions="Auto,Auto,Auto,Auto,21,Auto,Auto,21,Auto,Auto,21,Auto,Auto,21,Auto,Auto,Auto">
            <Label Grid.Row="0" Text="Confirmation" FontSize="20" FontAttributes="Bold" TextColor="#202020"
                HorizontalOptions="Center" />
            <StackLayout Grid.Row="1" Padding="0,10,0,0" Margin="20,20,0,0">
                <Frame x:Name="frame" HasShadow="True" HeightRequest="90" WidthRequest="90" CornerRadius="100" HorizontalOptions="Center" Padding="0">
                    <Image x:Name="img" Source="https://encrypted-tbn0.gstatic.com/images?q=tbn:ANd9GcRWR7fU-Ju22niixgRowQPqmhmMbv-4aKkcJQ" Aspect="AspectFill" />
                </Frame>
                <Label Text="Anushka Shetty" HorizontalOptions="Center" HorizontalTextAlignment="Center" FontSize="20" FontAttributes="Bold" TextColor="#202020"></Label>
            </StackLayout>
            <Label Grid.Row="2" Text="From" Margin="0,40,0,0" FontSize="15" TextColor="#202020" FontAttributes="Bold"></Label>
            <Label Grid.Row="3" Text="1234********5455" FontSize="15" TextColor="Gray" ></Label>
            <BoxView Grid.Row="4" Margin="0,10" BackgroundColor="LightGray"></BoxView>
            <Label Grid.Row="5" Text="To" FontSize="15" TextColor="#202020"  FontAttributes="Bold"></Label>
            <Label Grid.Row="6" Text="Karishma Sharma" FontSize="15" TextColor="Gray" ></Label>
            <BoxView Grid.Row="7" Margin="0,10" BackgroundColor="LightGray"></BoxView>
            <Label Grid.Row="8" Text="Transfer Amount" FontSize="15" TextColor="#202020" FontAttributes="Bold"></Label>
            <Label Grid.Row="9" Text="$360.00" FontSize="15" TextColor="Gray" ></Label>
            <BoxView Grid.Row="10" Margin="0,10" BackgroundColor="LightGray"></BoxView>
            <Label Grid.Row="11" Text="Transaction Fee" FontSize="15" TextColor="#202020" FontAttributes="Bold"></Label>
            <Label Grid.Row="12" Text="Free" FontSize="15" TextColor="Gray" ></Label>
            <BoxView Grid.Row="13" Margin="0,10" BackgroundColor="LightGray"></BoxView>
            <Label Grid.Row="14" Text="Total" FontSize="15" TextColor="#202020" FontAttributes="Bold"></Label>
            <Label Grid.Row="15" Text="$360.00" FontSize="15" TextColor="Gray" ></Label>
            <Button x:Name="btnPay" Grid.Row="16" Margin="0,20,0,0" HeightRequest="50"  CornerRadius="20"
                    Text="Confirm Payment"  BackgroundColor="#202020" TextColor="White" ></Button>
        </Grid>
    </ContentPage.Content>
</ContentPage>
Same UI Design for View Page using Listview. If you have more data to show or if you dont want to add numbers of label and boxview then use listview as shown in below.
View Page in xamarin form
First we will add template for listview.
 <ContentView xmlns="http://xamarin.com/schemas/2014/forms"
             xmlns:x="http://schemas.microsoft.com/winfx/2009/xaml"
             x:Class="OnlineBankingUIDesigns.Controls.ViewTemplate">
  <ContentView.Content>
      <StackLayout Padding="0,20">
            <Label Text="{Binding Title}" FontSize="15" TextColor="#202020" FontAttributes="Bold"></Label>
            <Label Text="{Binding Detail}" FontSize="15" TextColor="Gray" ></Label>
        </StackLayout>
  </ContentView.Content>
</ContentView>
Create View Page add following code.
 <ContentPage xmlns="http://xamarin.com/schemas/2014/forms"
             xmlns:x="http://schemas.microsoft.com/winfx/2009/xaml"
             xmlns:control="clr-namespace:OnlineBankingUIDesigns.Controls"
             x:Class="OnlineBankingUIDesigns.Views.ViewPage"
             Shell.NavBarIsVisible="False">
    <ContentPage.Content>
        <Grid HorizontalOptions="FillAndExpand" VerticalOptions="FillAndExpand" Padding="20"
              RowDefinitions="Auto,Auto,*,Auto">
            <Label Grid.Row="0" Text="Confirmation" FontSize="20" FontAttributes="Bold" TextColor="#202020"
                HorizontalOptions="Center" />
            <StackLayout Grid.Row="1" Padding="0,10,0,0" Margin="20,20,0,0">
                <Frame x:Name="frame" HasShadow="True" HeightRequest="90" WidthRequest="90" CornerRadius="100" HorizontalOptions="Center" Padding="0">
                    <Image x:Name="img" Source="https://encrypted-tbn0.gstatic.com/images?q=tbn:ANd9GcRWR7fU-Ju22niixgRowQPqmhmMbv-4aKkcJQ" Aspect="AspectFill" />
                </Frame>
                <Label Text="Anushka Shetty" HorizontalOptions="Center" HorizontalTextAlignment="Center" FontSize="20" FontAttributes="Bold" TextColor="#202020"></Label>
            </StackLayout>
            <ListView x:Name="listview" Grid.Row="2" Margin="0,20,0,0" HasUnevenRows="True">
                <ListView.ItemTemplate>
                    <DataTemplate>
                        <ViewCell>
                            <control:ViewTemplate></control:ViewTemplate>
                        </ViewCell>
                    </DataTemplate>
                </ListView.ItemTemplate>
            </ListView>
            <Button x:Name="btnPay" Grid.Row="3" Margin="0,20,0,0" HeightRequest="50"  CornerRadius="20"
                    Text="Confirm Payment"  BackgroundColor="#202020" TextColor="White" ></Button>
        </Grid>
    </ContentPage.Content>
</ContentPage>
Hope this is helpful to you, Please share your feedback in comment section. Thanks for reading.


Comments
Post a Comment