Posts

Showing posts with the label #xamarin

MVVM and MAUI - Checkout page for Ecommerce APP

Image
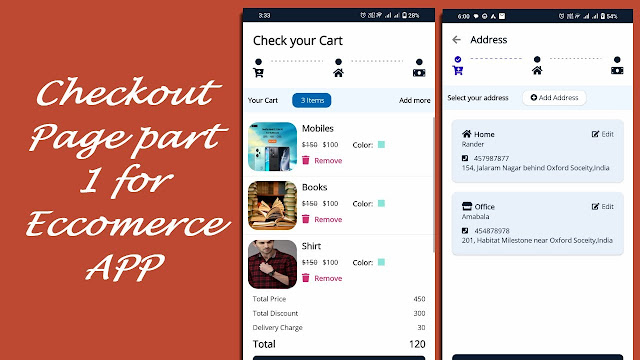
MVVM and MAUI - Checkout page for Ecommerce APP Please, support my blog by clicking on our sponsors ad! Watch this video to understand code. For fontawesome refer this   link First We will create all template CheckoutStepTemplate.xaml <ContentView xmlns="http://schemas.microsoft.com/dotnet/2021/maui" xmlns:x="http://schemas.microsoft.com/winfx/2009/xaml" x:Class="Ecommerce.UI.Template.Pages.CheckOut.Template.CheckoutStepTemplate" xmlns:fontawesome="clr-namespace:Ecommerce.UI.Template.Models"> <Grid x:Name="grid" ColumnDefinitions="Auto,*,Auto,*,Auto" HorizontalOptions="FillAndExpand" VerticalOptions="FillAndExpand"> <StackLayout Grid.Column="0" Spacing="5" > <Label x:Name="lblCartCircle" Text="{x:Static fontawesome:Solid.Circle}" HorizontalOpt

Product List and View Page for Ecommerce App

Image
Product list and view page for ecommerce App Please, support my blog by clicking on our sponsors ad! Let's create template for product list and view product For fontawesome refer this link Please watch this video to understand the code BackNavigation.xaml <ContentView xmlns="http://schemas.microsoft.com/dotnet/2021/maui" xmlns:x="http://schemas.microsoft.com/winfx/2009/xaml" x:Class="Ecommerce.UI.Template.CustomControls.BackNavigation" xmlns:fontawesome="clr-namespace:Ecommerce.UI.Template.Models"> <StackLayout Spacing="20" Grid.Row="0" Orientation="Horizontal"> <Label Text="{x:Static fontawesome:Solid.Arrow_Left}" FontSize="20" VerticalOptions="Center" FontFamily="FontAwesomeFreeSolid" TextColor="Gray"> <Label.GestureRecognizers> <TapGestur

Category List Page for Ecommerce App in MAUI

Image
  Category List Page for Ecommerce App In MAUI Please, support my blog by clicking on our sponsors ad! You can also see other ecommerce page : Authentication Page , Dashboard Please refer  Authentication Page  for resource. This code is explain in below video, please like share and subscribe   First we create categorymodel and categoryviewmodel public class CategoryViewModel { public ImageSource Img { get; set; } public string Title { get; set; } public string Description { get; set; } = "All Stock available"; } public class CategoryModel { public List<CategoryViewModel> GetCategory() { List<CategoryViewModel> list = new List<CategoryViewModel>(); list.Add(new CategoryViewModel { Img = "https://i.gadgets360cdn.com/products/large/redmi-note-11t-5g-824x800-1638256477.jpg", Title = "Mobiles" }); list.Add(new CategoryViewModel { Img

Exploring Xamarin Forms: Enhancing Your App's UI with Images

Image
In Xamarin.Forms, the Image control is used to display an image in your application's user interface. The Image control can display images from a variety of sources, including resources, files, and URLs. The Image control supports several properties that can be used to control the way the image is displayed, such as Aspect, HeightRequest, and WidthRequest. You can also use data binding to dynamically set the Source property of the Image control. Please, support my blog by clicking on our sponsors ad! Please watch the video to understand image briefly Here's an example of how to use the Image control in your Xamarin.Forms application: Add the Image control to your XAML page: <Image Source="myImage.png" /> Set the Source property of the Image control to the path of the image you want to display. You can use a local file path or a URL: // Local file path <Image Source = "myImage.png" /> // URL <Image S

Find out how to implement appshell in xamarin forms

Image
Xamarin.Forms 4.0 introduced the amazing feature called Xamarins.Forms Shell. It has reduced complexity of creating mobile apps. Please, support my blog by clicking on our sponsors ad! It is used for Navigation,URI base routing, integrated search handling. Before Appshell there was independent feature: MasterDetailPage TabbedPage NavigationPage but Appshell has combine this and make easy creating apps. > You can add xaml file in your project and named it as AppShell.xaml and Update it like below code: AppShell.Xaml <?xml version="1.0" encoding="utf-8" ?> <Shell xmlns="http://xamarin.com/schemas/2014/forms" xmlns:x="http://schemas.microsoft.com/winfx/2009/xaml" x:Class="XamarinCourse.AppShell"> </Shell> AppShell.Xaml.cs public partial class AppShell : Shell { public AppShell() { InitializeComponent(); } } You can call this class

Map in xamarin form

Image
  Maps in xamarin forms Please, support my blog by clicking on our sponsors ad! First Add Nugget in all projects Xamarin.Forms.Map Lets Configure in IOS project to show map in iphone  In AppDelegate.cs file, Initialize the map below "global::Xamarin.Forms.Forms.Init();" line in "FinishedLaunching" method FormsMaps.Init(); Add following key in info.plist for permission <key>NSLocationWhenInUseUsageDescription </key> <string>Allow map to access to your location while you use the app.</string> <key>NSLocationAlwaysAndWhenInUseUsageDescription</key> <string>Always Allow map to access to your location</string> <key>NSLocationUsageDescription</key> <string>We would like to show you a map</string> <key>NSLocationAlwaysUsageDescription</key> <string>We would like to show you a map</string> Now Let's configure for android proj

Part 8 - Absolute Layout in Xamarin form

Image
 Absolute layout is used to position and size children using explicit values. The position is specified by the upper-left corner of the child relative to the upper-left corner of the AbsoluteLayout, in device independent units.Absolute Layout also implement proportional positioning and sizing feature. Please, support my blog by clicking on our sponsors ad! The Absolute Layout has two properties: LayoutBounds LayoutFlags Layout Bounds The default value is (0,0,Autosize,Autosize). The Parameter is as X,Y,Width,Height. LayoutFlags The default value of this property is AbsoluteLayoutFlags.None. This property indicates that the position and size are interpreted proportionally. Proportional values are from 0-1. 0 indicates 0% and 1 indicates 100%. If you want to use 50% then value will be 0.5 Values are as follow: None This is default value. this is autosize/fixed value. XProportional Indicates that what percentage X of parent should use, while other are absolute values YPropor

Xamarin Tutorial Part 6 - Grid in code

Image
 Before you start with this blog, go to this syntax and tutorial blog. It will easy to understand the code of this blog. Grid through cs code Grid in xaml Please, support my blog by clicking on our sponsors ad! Below code for grid in c# Code. This is recommended when it has to add at runtime. By default you can add grid through xaml, Because xaml is easy to code and understand. var grid = new Grid(); var autoRow = new RowDefinition() { Height = new GridLength(1, GridUnitType.Auto) }; var fixRow = new RowDefinition() { Height = new GridLength(200) }; var starRow = new RowDefinition() { Height = new GridLength(1, GridUnitType.Star) }; var col1 = new ColumnDefinition() { Width = new GridLength(1, GridUnitType.Star) }; var col2 = new ColumnDefinition() { Width = new GridLength(1, GridUnitType.Star) }; var col3 = new ColumnDefinition() { Width = new GridLength(1, GridUnitType.Star) }; var col4 = new ColumnDefinition() { Width = new GridLength(