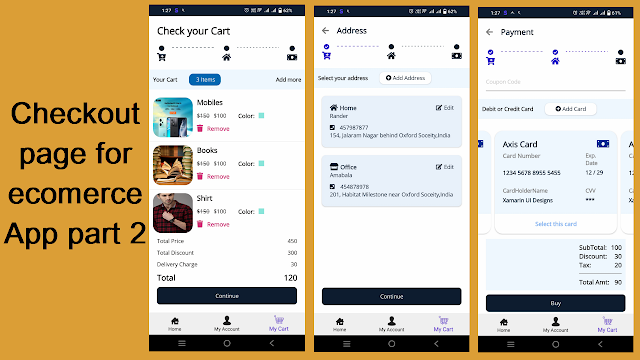
Posts

Showing posts with the label #UIDesign

Ecommerce App - Checout Page Part 2

Image
  Please, support my blog by clicking on our sponsors ad! For first part go to this link For fontawesome go to this link First create all required classes CardModel.cs public class CardModel : BaseViewModel { private Color borderColor; private bool isSelected; public string Name { get; set; } public string Number { get; set; } public string ExpDate { get; set; } public string CardHolderName { get; set; } public string CVV { get; set; } public string Type { get; set; } public string TypeIcon { get; set; } public bool IsSelected { get { return isSelected; } set { isSelected = value; OnPropertyChanged(nameof(IsSelected)); OnPropertyChanged(nameof(BorderColor)); } } public Color BorderColor { get {

MVVM MAUI Ecommerce APP Address Entry Form

Image
  Create a Address Entry Form in xamarin Please, support my blog by clicking on our sponsors ad! Watch video to understand code. For fontawesome refer this   link Lets create all Controls ImageLabel.xaml <ContentView xmlns="http://schemas.microsoft.com/dotnet/2021/maui" xmlns:x="http://schemas.microsoft.com/winfx/2009/xaml" x:Class="Ecommerce.UI.Template.CustomControls.ImageLabel"> <Grid RowDefinitions="Auto,Auto"> <Label x:Name="lblIcon" FontFamily="{x:DynamicResource FontAwesomeFamily}" HorizontalOptions="Center" TextColor="Gray" Grid.Column="0" Grid.Row="0"></Label> <Label x:Name="lbl" Grid.Column="0" Grid.Row="1" HorizontalOptions="FillAndExpand" HorizontalTextAlignment="Center" TextColor="Gray"></Label>

Create PopUp in .Net MAUI

Image
Popup in .net Maui Please, support my blog by clicking on our sponsors ad! Popups are an integral part of user interface design, allowing developers to convey information and interact with users in a more engaging manner. In .NET MAUI, there are three main types of popups available: DisplayAlert, DisplayPrompt, and Plugin.Maui.Popup. In this blog post, we will dive into each of these popup types, explore their functionalities, and provide code examples to demonstrate their usage. DisplayAlert: Simple and Informative Popups DisplayAlert is a built-in feature in .NET MAUI that provides a straightforward way to display alert popups to users. These popups typically present important messages, notifications, or warnings that require user acknowledgement. Here's an example of how to use DisplayAlert in your .NET MAUI application: DisplayAlert("Display Alert", "Welcome to DotNet Maui", "OK","Cancel",FlowDirection.RightToLeft); In the co

Find out how to implement appshell in xamarin forms

Image
Xamarin.Forms 4.0 introduced the amazing feature called Xamarins.Forms Shell. It has reduced complexity of creating mobile apps. Please, support my blog by clicking on our sponsors ad! It is used for Navigation,URI base routing, integrated search handling. Before Appshell there was independent feature: MasterDetailPage TabbedPage NavigationPage but Appshell has combine this and make easy creating apps. > You can add xaml file in your project and named it as AppShell.xaml and Update it like below code: AppShell.Xaml <?xml version="1.0" encoding="utf-8" ?> <Shell xmlns="http://xamarin.com/schemas/2014/forms" xmlns:x="http://schemas.microsoft.com/winfx/2009/xaml" x:Class="XamarinCourse.AppShell"> </Shell> AppShell.Xaml.cs public partial class AppShell : Shell { public AppShell() { InitializeComponent(); } } You can call this class

Xamarin Tutorial Part 4 - Grid for Xamarin Forms

 What is Grid? with live example please watch: https://youtu.be/gZQyqKheUF4 https://youtu.be/e8cYsSw752s Please, support my blog by clicking on our sponsors ad! Grid is a layout type that allow you to create design using rows/columns Let's see how to use Grid Use Grid tag to create design <Grid></Grid> In C# var grid = new Grid() There are three type of cell size 1) Absolute : Fix size <Grid ColumnDefinition = "50,70,80" /> There will be three Column cell  1st row cell width will be 50  2nd cell width will be70  3rd cell width will be 80 2)  Auto: Will use size of data <Grid ColumnDefinition = "70,70,Auto"/> There will be three Column cell  1st row cell width will be 70  2nd cell width will be70  3rd cell width will be according to data 3) Star: It expand propotionally to space size <Grid ColumnDifinition="*,2*,5*"/> 2* = 20%,  5* = 50%,  100-70 = 30 so * = 30% There will be three Column cell  1st row c

Push Notification using Firebase in xamarin form (Android and IOS)

Image
Push Notification using Firebase in xamarin form (Android and IOS) Please, support my blog by clicking on our sponsors ad! Watch video to understand the code: https://youtu.be/1Ixc_B86mDk Follow steps to create push notification in both project. Create Project in  https://console.firebase.google.com/ Create Project for push notification After Creating Project add app for both IOS and Android Project. Create app in project For Both IOS and Android project add Package name. Package name should be same as your package name in Xamarin Android and IOS Project. Click on Register App Download Google Service json. If you are in android app then download google-services.json else if you are in ios app then download "GoogleService-Info.plist" file Click Next then click Next then Click Continue to console button. We have created project in firebase console now we will continue coding in xamarin. In Android Project add Internet Permission. Right click on android project ->

Upload Image in Xamarin Form

Image
  Upload image in xamarin form   Get fontawesome code from   here First we will add control. ChoosePhotoControl.Xaml <ContentView xmlns="http://xamarin.com/schemas/2014/forms" xmlns:x="http://schemas.microsoft.com/winfx/2009/xaml" x:Class="SchoolUIDesigns.Control.ChoosePhotoControl"> <ContentView.Content> <Grid RowDefinitions="Auto,Auto" ColumnDefinitions="Auto"> <Label x:Name="lblFontawesomeText" FontFamily="{StaticResource FontAwesomeSolid}" FontSize="40" HorizontalOptions="Center" Grid.Row="0" TextColor="#08457E"></Label> <Label x:Name="lblText" TextColor="Black" Grid.Row="1" HorizontalOptions="Center" FontSize="14"></Label> </Grid> </ContentView.Content> </ContentView> ChoosePhotoControl.x

Hotel UI Design using xamarin Form

Image
  Hotel UI Design using xamarin form First we will create template get fontawesome code from  here Copy code for CustomEntry from  this link . FilterTemplate.xaml <ContentView xmlns="http://xamarin.com/schemas/2014/forms" xmlns:x="http://schemas.microsoft.com/winfx/2009/xaml" x:Class="HotelUIDesign.Views.Search_Page.Template.FilterTemplate"> <ContentView.Content> <StackLayout Padding="5"> <Frame CornerRadius="20" HasShadow="True"> <Grid ColumnDefinitions="Auto,Auto"> <Label Grid.Column="0" Text="{Binding Filter}" TextColor="#202020"></Label> <Label Grid.Column="1" VerticalOptions="Center" TextColor="#202020" FontFamily="{StaticResource FontAwesomeSolid}" FontSize="20"