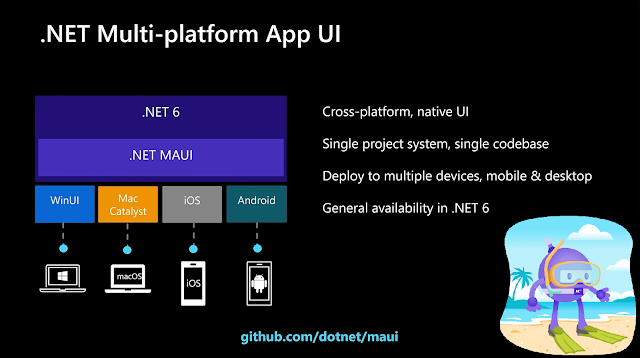
Posts

Showing posts with the label #mobiledeveloper

What is .Net MAUI?

Image
  watch video to understand. Please, support my blog by clicking on our sponsors ad! Let's learn have some basic knowledge about .NET MAUI. Today we look for following: What is .Net MAUI? Difference between Xamarin and .Net MAUI Why Xamarin Obsolete? How to install .Net MAUI? What is .Net MAUI? .Net Maui is a evolution of xamarin forms with better performance and extensibility .Net MAUI is a cross platform framework where you are allow to create mobile apps (IOS,android,window) and also window app and MacOS with single codebase with c# and xaml. It will share UI layout, Code, Test, Buisiness logic. .Net MAUI support Hot reload which allow you to modify source code while app is running. Difference between Xamarin and .Net MAUI? You will notice that there will many similarity in xamarin and .net MAUI like controls,layout,shell,guesture,template,cross platform api. .Net maui is faster than xamarin  .Net maui allow you to develop andoid,ios,macos and window a

Push Notification using Firebase in xamarin form (Android and IOS)

Image
Push Notification using Firebase in xamarin form (Android and IOS) Please, support my blog by clicking on our sponsors ad! Watch video to understand the code: https://youtu.be/1Ixc_B86mDk Follow steps to create push notification in both project. Create Project in  https://console.firebase.google.com/ Create Project for push notification After Creating Project add app for both IOS and Android Project. Create app in project For Both IOS and Android project add Package name. Package name should be same as your package name in Xamarin Android and IOS Project. Click on Register App Download Google Service json. If you are in android app then download google-services.json else if you are in ios app then download "GoogleService-Info.plist" file Click Next then click Next then Click Continue to console button. We have created project in firebase console now we will continue coding in xamarin. In Android Project add Internet Permission. Right click on android project ->

Upload Image in Xamarin Form

Image
  Upload image in xamarin form   Get fontawesome code from   here First we will add control. ChoosePhotoControl.Xaml <ContentView xmlns="http://xamarin.com/schemas/2014/forms" xmlns:x="http://schemas.microsoft.com/winfx/2009/xaml" x:Class="SchoolUIDesigns.Control.ChoosePhotoControl"> <ContentView.Content> <Grid RowDefinitions="Auto,Auto" ColumnDefinitions="Auto"> <Label x:Name="lblFontawesomeText" FontFamily="{StaticResource FontAwesomeSolid}" FontSize="40" HorizontalOptions="Center" Grid.Row="0" TextColor="#08457E"></Label> <Label x:Name="lblText" TextColor="Black" Grid.Row="1" HorizontalOptions="Center" FontSize="14"></Label> </Grid> </ContentView.Content> </ContentView> ChoosePhotoControl.x

Payment UI Design using xamarin form

Image
  Payment UI Design using xamarin form Add following code in App.xaml in Resource Dictionary tag get fontawesome code from here Watch video  to understand code       <Color x:Key="Primary">#3AC3D6</Color>             <Color x:Key="Secondary">#FFFFFF</Color>             <Color x:Key="TextColorGray">#333333</Color>             <Color x:Key="SeparatorColor">#E8E8E9</Color>             <Color x:Key="BGColor">#FFFCF7</Color>             <Style TargetType="Label" x:Key="PoppinsBoldLabel">                 <Setter Property="FontFamily" Value="Helvetica"></Setter>                 <Setter Property="FontAttributes" Value="Bold"></Setter>                 <Setter Property="TextColor" Value="{x:DynamicResource TextColorGray}"></Setter>             </Style>          

Dashboard similar as Amazon Dashboard

Image
  Dashboard in xamarin form You can get fontawesome from this link . First we will create custom navigation bar TopNavBar.xaml <ContentView xmlns="http://xamarin.com/schemas/2014/forms" xmlns:x="http://schemas.microsoft.com/winfx/2009/xaml" x:Class="EShoppingUIDesigns.Controls.TopNavBar" xmlns:fontawesome="clr-namespace:EShoppingUIDesigns" BackgroundColor="#3AC3D6"> <ContentView.Content> <Grid HorizontalOptions="FillAndExpand" RowDefinitions="Auto,Auto" RowSpacing="20" ColumnDefinitions="Auto,*,Auto" Padding="10"> <Image Grid.Row="0" Grid.Column="0" Source="threelines.png" Aspect="AspectFill" HeightRequest="20" WidthRequest="25"></Image> <Label Grid.Row="0" Grid.Column="1" Margin="10,0,

School UI Design - Fees Gallery Profile using xamarin form

Image
School UI Design using xamarin form Code is explain in this video First add  Fontawesome  in your project. All Part of School UI Design: https://xamarinuidesigns.blogspot.com/2022/03/school-ui-design-using-xamarin-form.html https://xamarinuidesigns.blogspot.com/2022/03/school-ui-design-using-xamarin-form_4.html https://xamarinuidesigns.blogspot.com/2022/03/school-ui-design-using-xamarin-form_10.html https://xamarinuidesigns.blogspot.com/2022/03/school-ui-design-fees-gallery-profile.html FeesView.Xaml <ContentView xmlns="http://xamarin.com/schemas/2014/forms" xmlns:x="http://schemas.microsoft.com/winfx/2009/xaml" x:Class="SchoolUIDesigns.Control.FeesView"> <ContentView.Content> <Grid ColumnDefinitions="40,*,Auto" RowDefinitions="Auto,Auto" RowSpacing="0"> <Label x:Name="lblIcon" Grid.Row="0" Grid.RowSpan="2" Grid.Column="0