Posts

Showing posts with the label #Blog

Create a Taxi Booking Project in flutter

Image
Introduction: In today's fast-paced world, the demand for efficient transportation solutions is ever-growing. Taxi booking apps have emerged as indispensable tools, offering users convenience and reliability in navigating urban landscapes. Leveraging the power of Flutter, a versatile and efficient cross-platform framework, developers can craft robust and feature-rich taxi booking apps that meet the needs of modern travelers. In this guide, we'll explore how to build a taxi booking app with Flutter, incorporating essential features like a dashboard, maps integration, online payment, and route selection, all while adhering to the MVVM architecture. Building the Taxi Booking App with Flutter Project Setup: Begin by creating a new Flutter project and setting up the necessary dependencies, including packages for state management and maps integration. Model Definition: Define the data model for the app, encompassing classes to represent rides, user information, payment details, and ...

Taxi Booking in Flutter - RideDetail dart

Image
 Create a file named as 'RideDetail.dart' in Lib Folder and paste following code: Please, support my blog by clicking on our sponsors ad! import 'package:flutter/material.dart'; import 'package:font_awesome_flutter/font_awesome_flutter.dart'; import 'package:myfirstproject/Dashboard.dart'; import 'package:myfirstproject/cards/areaspot_card.dart'; import 'package:myfirstproject/cards/location_card.dart'; import 'package:myfirstproject/common/bottomnavigationbar.dart'; import 'package:myfirstproject/common/constants.dart'; import 'package:myfirstproject/ViewModels/locationviewmodel.dart'; import 'package:provider/provider.dart'; class RideDetail extends StatefulWidget { const RideDetail({Key? key}) : super(key: key); @override RideDetailState createState() => RideDetailState(); } class RideDetailState extends State { final LocationViewModel locationViewModel = LocationViewModel(); ...

Taxi Booking in Flutter - LocationModel dart file

Image
 Create a file named as 'locationmodel.dart' in lib -> models folder and paste following code: Please, support my blog by clicking on our sponsors ad! import 'package:myfirstproject/models/AreaSpotModel.dart'; class LocationModel { late final String Name; late final String Img ; late final String Distance; late final String Rate; late final String Address; late final String Spot1; late final String Spot2; LocationModel({ required this.Name,required this.Img,required this.Distance, required this.Rate, required this.Address, required this.Spot1,required this.Spot2}); } Go to Main project

Taxi booking in flutter - Location_Cart.dart

Image
 Create a file named as 'location_card.dart' in lib -> cards folder and paste following code: Please, support my blog by clicking on our sponsors ad! import 'package:flutter/material.dart'; import 'package:font_awesome_flutter/font_awesome_flutter.dart'; import 'package:myfirstproject/common/constants.dart'; import 'package:myfirstproject/models/locationmodel.dart'; class LocationCard extends StatelessWidget { late final LocationModel locationModel; LocationCard({required this.locationModel}); @override Widget build(BuildContext context) { return Card(elevation: 0, child: Container( width: 150,height: 180, decoration: BoxDecoration(borderRadius: BorderRadius.circular(20.0), color: Colors.white), child: Padding( padding: const EdgeInsets.all(10), child: Column( children: [ ClipRRect(borderRadius: BorderRadius.circular(20.0), child: Image.network(location...

Taxi Booking in Flutter - AreaSpot_Card dart file

Image
 Create a file named as 'areaspot_card.dart' in lib -> cards folder and paste following code: Please, support my blog by clicking on our sponsors ad! import 'package:flutter/material.dart'; import 'package:font_awesome_flutter/font_awesome_flutter.dart'; import 'package:myfirstproject/models/locationmodel.dart'; import 'package:myfirstproject/common/constants.dart'; class AreaSpotCard extends StatelessWidget { late final LocationModel locationModel; AreaSpotCard({required this.locationModel}); @override Widget build(BuildContext context) { return Card(color: SecondaryColor,elevation: 0, shape: RoundedRectangleBorder(borderRadius: BorderRadius.circular(0)), child: Padding( padding: const EdgeInsets.only(top: 20.0,left: 20.0,right: 20.0,bottom: 0.0), child: Container(decoration: BoxDecoration(color: Colors.white, borderRadius: BorderRadius.circular(20)), child: Padding( padding: const EdgeInsets.all(...

Taxi Booking in Flutter - Dashboart.dart

Image
 Create a file named as 'Dashboard.dart' in LibFolder and paste following code: Please, support my blog by clicking on our sponsors ad! import 'package:flutter/material.dart'; import 'package:flutter/scheduler.dart'; import 'package:myfirstproject/RideDetail.dart'; import 'package:myfirstproject/ViewModels/locationviewmodel.dart'; import 'package:myfirstproject/cards/location_card.dart'; import 'package:provider/provider.dart'; import 'common/constants.dart'; import 'package:font_awesome_flutter/font_awesome_flutter.dart'; import 'common/bottomnavigationbar.dart'; class Dashboard extends StatefulWidget { const Dashboard({Key? key}) : super(key: key); @override DashboardState createState() => DashboardState(); } class DashboardState extends State { final LocationViewModel locationViewModel = LocationViewModel(); @override void initState() { locationViewModel.GetData(); ...

Create PopUp in .Net MAUI

Image
Popup in .net Maui Please, support my blog by clicking on our sponsors ad! Popups are an integral part of user interface design, allowing developers to convey information and interact with users in a more engaging manner. In .NET MAUI, there are three main types of popups available: DisplayAlert, DisplayPrompt, and Plugin.Maui.Popup. In this blog post, we will dive into each of these popup types, explore their functionalities, and provide code examples to demonstrate their usage. DisplayAlert: Simple and Informative Popups DisplayAlert is a built-in feature in .NET MAUI that provides a straightforward way to display alert popups to users. These popups typically present important messages, notifications, or warnings that require user acknowledgement. Here's an example of how to use DisplayAlert in your .NET MAUI application: DisplayAlert("Display Alert", "Welcome to DotNet Maui", "OK","Cancel",FlowDirection.RightToLeft); In the co...

Find out how to implement appshell in xamarin forms

Image
Xamarin.Forms 4.0 introduced the amazing feature called Xamarins.Forms Shell. It has reduced complexity of creating mobile apps. Please, support my blog by clicking on our sponsors ad! It is used for Navigation,URI base routing, integrated search handling. Before Appshell there was independent feature: MasterDetailPage TabbedPage NavigationPage but Appshell has combine this and make easy creating apps. > You can add xaml file in your project and named it as AppShell.xaml and Update it like below code: AppShell.Xaml <?xml version="1.0" encoding="utf-8" ?> <Shell xmlns="http://xamarin.com/schemas/2014/forms" xmlns:x="http://schemas.microsoft.com/winfx/2009/xaml" x:Class="XamarinCourse.AppShell"> </Shell> AppShell.Xaml.cs public partial class AppShell : Shell { public AppShell() { InitializeComponent(); } } You can call this class...

Map in xamarin form

Image
  Maps in xamarin forms Please, support my blog by clicking on our sponsors ad! First Add Nugget in all projects Xamarin.Forms.Map Lets Configure in IOS project to show map in iphone  In AppDelegate.cs file, Initialize the map below "global::Xamarin.Forms.Forms.Init();" line in "FinishedLaunching" method FormsMaps.Init(); Add following key in info.plist for permission <key>NSLocationWhenInUseUsageDescription </key> <string>Allow map to access to your location while you use the app.</string> <key>NSLocationAlwaysAndWhenInUseUsageDescription</key> <string>Always Allow map to access to your location</string> <key>NSLocationUsageDescription</key> <string>We would like to show you a map</string> <key>NSLocationAlwaysUsageDescription</key> <string>We would like to show you a map</string> Now Let's configure for android proj...

What is .Net MAUI?

Image
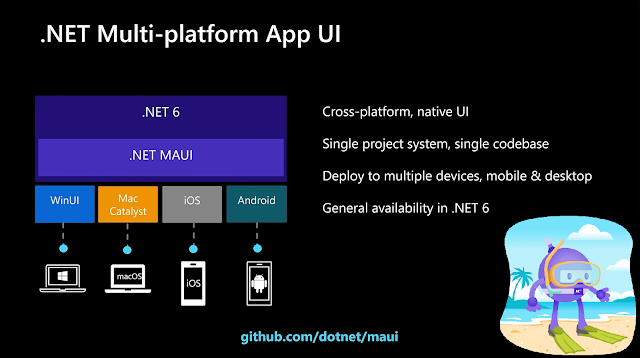
  watch video to understand. Please, support my blog by clicking on our sponsors ad! Let's learn have some basic knowledge about .NET MAUI. Today we look for following: What is .Net MAUI? Difference between Xamarin and .Net MAUI Why Xamarin Obsolete? How to install .Net MAUI? What is .Net MAUI? .Net Maui is a evolution of xamarin forms with better performance and extensibility .Net MAUI is a cross platform framework where you are allow to create mobile apps (IOS,android,window) and also window app and MacOS with single codebase with c# and xaml. It will share UI layout, Code, Test, Buisiness logic. .Net MAUI support Hot reload which allow you to modify source code while app is running. Difference between Xamarin and .Net MAUI? You will notice that there will many similarity in xamarin and .net MAUI like controls,layout,shell,guesture,template,cross platform api. .Net maui is faster than xamarin  .Net maui allow you to develop andoid,ios,macos and win...

Nested Template Using MVVM - Xamarin Form

Image
Nested Template MVVM - Xamarin Form Please, support my blog by clicking on our sponsors ad! Code is explain in this video SkillTemplate.xaml <ContentView xmlns="http://xamarin.com/schemas/2014/forms" xmlns:x="http://schemas.microsoft.com/winfx/2009/xaml" xmlns:vm="clr-namespace:MVVMDemo.ViewModels" x:Class="MVVMDemo.Views.ListTemplate.SkillTemplate"> <ContentView.Content> <StackLayout x:DataType="vm:TechnicalSkill" Padding="0,10"> <Label Text="{Binding Name}" TextColor="Black"/> </StackLayout> </ContentView.Content> </ContentView> EducationTemplate.xaml <ContentView xmlns="http://xamarin.com/schemas/2014/forms" xmlns:x="http://schemas.microsoft.com/winfx/2009/xaml" xmlns:vm="clr-namespace:MVVMDemo.ViewModels" x:C...

How to send Firebase Push Notification through API

Image
  Please, support my blog by clicking on our sponsors ad! In this blog  we learn how to send push notification. Now we will see how to send Notification using API. Create Server Key in Console firebase Call following API to send push notification URL:  https://fcm.googleapis.com/fcm/send Method: POST Headers: Authorization: key=server key (you can get it from firebase console) Content-Type: application/json Body { "to" : "FCM Token goes here", "notification" : { "body" : "New Lesson Added 1", "title": "Lokesh" } } Hope you understand this, Please share your feedback and enjoy coding.

Razor Pay using xamarin form (only for Android)

Image
  Razor Pay using xamarin form Please, support my blog by clicking on our sponsors ad! Code is Explain in this video To integrate razor pay in Xamarin, follow below steps: Create account in Razorpay. Create key in Razorpay, later will use for implementing Razorpay gateway in Xamarin form. Create Account in Razorpay. Create account in Razorpay Create account in Razorpay . Create Key in Razorpay. Go to setting in left menu and generate key Generate key in razor pay Generate key in razor pay Now we code in Xamarin to implement Razorpay. Download RazorpayBindingforxamarin.dll  and reference to android project. Razorpay in xamarin form Mainactivity.cs Add Namespace using Com.Razorpay; and declare variable RazorResponseViewModel responseViewModel = new RazorResponseViewModel(); In OnCreate method after LoadApplication(new App()) line add below code: MessagingCenter.Subscribe<RazorResponseViewModel>(this, "PayNow", (payload) => { ...