Posts

Showing posts with the label #tutorial

How to send Firebase Push Notification through API

Image
  Please, support my blog by clicking on our sponsors ad! In this blog  we learn how to send push notification. Now we will see how to send Notification using API. Create Server Key in Console firebase Call following API to send push notification URL:  https://fcm.googleapis.com/fcm/send Method: POST Headers: Authorization: key=server key (you can get it from firebase console) Content-Type: application/json Body { "to" : "FCM Token goes here", "notification" : { "body" : "New Lesson Added 1", "title": "Lokesh" } } Hope you understand this, Please share your feedback and enjoy coding.

Razor Pay using xamarin form (only for Android)

Image
  Razor Pay using xamarin form Please, support my blog by clicking on our sponsors ad! Code is Explain in this video To integrate razor pay in Xamarin, follow below steps: Create account in Razorpay. Create key in Razorpay, later will use for implementing Razorpay gateway in Xamarin form. Create Account in Razorpay. Create account in Razorpay Create account in Razorpay . Create Key in Razorpay. Go to setting in left menu and generate key Generate key in razor pay Generate key in razor pay Now we code in Xamarin to implement Razorpay. Download RazorpayBindingforxamarin.dll  and reference to android project. Razorpay in xamarin form Mainactivity.cs Add Namespace using Com.Razorpay; and declare variable RazorResponseViewModel responseViewModel = new RazorResponseViewModel(); In OnCreate method after LoadApplication(new App()) line add below code: MessagingCenter.Subscribe<RazorResponseViewModel>(this, "PayNow", (payload) => {

Scrollable Calendar and Time Control in Xamarin Form

Image
  Scrollable Calendar and Time Control in xamarin form Please, support my blog by clicking on our sponsors ad! In this Blog , we have create control for calendar and time, in which control can scroll using button. In this control can scroll by your finger tips. Lets start with the code: First we will create template for calendar and time control CalendarTemplate.xaml <ContentView xmlns="http://xamarin.com/schemas/2014/forms" xmlns:x="http://schemas.microsoft.com/winfx/2009/xaml" xmlns:vm="clr-namespace:SchoolUIDesigns.ViewModels" x:Class="SchoolUIDesigns.Control.CalendarTemplate"> <ContentView.Content> <Grid RowDefinitions="Auto,Auto" x:DataType="vm:CalendarViewModel" Padding="10,0"> <Label Text="{Binding WeekName}" Grid.Row="0" FontAttributes="Bold" /> <Label Text="{Binding Da

Push Notification using Firebase in xamarin form (Android and IOS)

Image
Push Notification using Firebase in xamarin form (Android and IOS) Please, support my blog by clicking on our sponsors ad! Watch video to understand the code: https://youtu.be/1Ixc_B86mDk Follow steps to create push notification in both project. Create Project in  https://console.firebase.google.com/ Create Project for push notification After Creating Project add app for both IOS and Android Project. Create app in project For Both IOS and Android project add Package name. Package name should be same as your package name in Xamarin Android and IOS Project. Click on Register App Download Google Service json. If you are in android app then download google-services.json else if you are in ios app then download "GoogleService-Info.plist" file Click Next then click Next then Click Continue to console button. We have created project in firebase console now we will continue coding in xamarin. In Android Project add Internet Permission. Right click on android project ->

Upload Image in Xamarin Form

Image
  Upload image in xamarin form   Get fontawesome code from   here First we will add control. ChoosePhotoControl.Xaml <ContentView xmlns="http://xamarin.com/schemas/2014/forms" xmlns:x="http://schemas.microsoft.com/winfx/2009/xaml" x:Class="SchoolUIDesigns.Control.ChoosePhotoControl"> <ContentView.Content> <Grid RowDefinitions="Auto,Auto" ColumnDefinitions="Auto"> <Label x:Name="lblFontawesomeText" FontFamily="{StaticResource FontAwesomeSolid}" FontSize="40" HorizontalOptions="Center" Grid.Row="0" TextColor="#08457E"></Label> <Label x:Name="lblText" TextColor="Black" Grid.Row="1" HorizontalOptions="Center" FontSize="14"></Label> </Grid> </ContentView.Content> </ContentView> ChoosePhotoControl.x

Tips and Tricks in Xamarin Forms

 Hi Developer, I hope all you are fine. Lets start with tips and tricks for xamarin form which will be useful for you. For better understand please watch video . RefreshView The Refreshview  is a container control that provides pull to refresh functionality for scrollable content.  This control will work if you have use scrollview. sometime we use only listview or collectionview which does not required scrollview, if we use scrollview the it will show space at the bottom of the page.so simply write below code: <RefreshView x:Name="refreshView" Refreshing="refreshView_Refreshing"> <ScrollView x:Name="MainScroll"> <ContentView HeightRequest="{Binding Source={x:Reference MainScroll},Path=Height}"> <!---- Your UI Design--> </ContentView> </ScrollView> </RefreshView> Activity Indicator Refreshview show loader on top of the pa

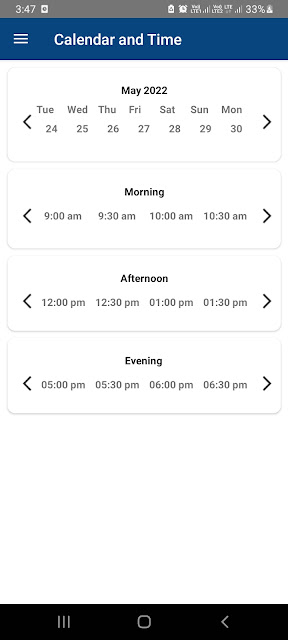
Calendar and Time View using Xamarin Form

Image
Calendar and Time view in xamarin form First we fill add calendar and time template Download right and left arrow image from google and add in your project. code is explain in this video. CalendarTemplate.xaml <ContentView xmlns="http://xamarin.com/schemas/2014/forms" xmlns:x="http://schemas.microsoft.com/winfx/2009/xaml" xmlns:vm="clr-namespace:SchoolUIDesigns.ViewModels" x:Class="SchoolUIDesigns.Control.CalendarTemplate"> <ContentView.Content> <Grid RowDefinitions="Auto,Auto" x:DataType="vm:CalendarViewModel"> <Label Text="{Binding WeekName}" Grid.Row="0" FontAttributes="Bold" /> <Label Text="{Binding Date}" Grid.Row="1" HorizontalOptions="Center" FontAttributes="Bold" /> </Grid> </ContentView.Content> </ContentView>