Posts

Showing posts from 2022

Xamarin Tutorial Part 4 - Grid for Xamarin Forms

 What is Grid? with live example please watch: https://youtu.be/gZQyqKheUF4 https://youtu.be/e8cYsSw752s Please, support my blog by clicking on our sponsors ad! Grid is a layout type that allow you to create design using rows/columns Let's see how to use Grid Use Grid tag to create design <Grid></Grid> In C# var grid = new Grid() There are three type of cell size 1) Absolute : Fix size <Grid ColumnDefinition = "50,70,80" /> There will be three Column cell  1st row cell width will be 50  2nd cell width will be70  3rd cell width will be 80 2)  Auto: Will use size of data <Grid ColumnDefinition = "70,70,Auto"/> There will be three Column cell  1st row cell width will be 70  2nd cell width will be70  3rd cell width will be according to data 3) Star: It expand propotionally to space size <Grid ColumnDifinition="*,2*,5*"/> 2* = 20%,  5* = 50%,  100-70 = 30 so * = 30% There will be three Column cell  1st row c

Xamarin Tutorial Part -3 (How to add control)

Image
Please, support my blog by clicking on our sponsors ad!  Let's learn how to add control in XAML and code In below code, contentpage is content " [ Xamarin.Forms.ContentProperty( "Content" ) ]".  This is a page which display single view. It means that it will hold only one control. The code will be as follow: <ContentPage xmlns="http://xamarin.com/schemas/2014/forms" xmlns:x="http://schemas.microsoft.com/winfx/2009/xaml" x:Class="LoginUIDesigns.Views.Login.MyFirstPage"> <ContentPage.Content> <Label Text="Welcome to Xamarin.Forms!" TextColor="Black" VerticalOptions="CenterAndExpand" HorizontalOptions="CenterAndExpand" /> </ContentPage.Content> </ContentPage> Let see how we can write this code in code behind file. public partial class MyFirstPage : ContentPage {

Xamarin Tutorial Part - 2 (Create your first project.)

Image
How to create first xamarin form application?   Please, support my blog by clicking on our sponsors ad! Follow step to create xamarin aaplication. (I am using visual studio 2019) Explain in this video 1) Click on create a new project option 2) Select Mobile App (Xamarin.Forms) then click on next button. 3) Give Project name for your application, then select location, then click on create button 4) Select Template, then click on create button. There are three templated: Flyout In this template, there will be hamburger menu, when you click on it, menu will open from left side Tabbed In this template, there will tab in bottom of the application. Blank It will be bank project After clicking on create button, your solution will be created with three project Main Project Xamarin.Android project Xamarin.IOS Project These three are the architecture of the xamarin. Difference between Emulator and Simulator? Emulator: Android virtual device Simulator: IOS virtual device Emulator? I

Xamarin Tutorial Part 1

Image
  Please, support my blog by clicking on our sponsors ad! Xamarin is company started in 2011 who build the software. It is a framework to develop the mobile application using single code. With single code, application build in three platform (Android, IOS, Windows). Most of the platforms are used is android and ios. Please go through this video It support three language c#, f#, vb.net, but most of the developer preferred c#. Xamairn use XAML (Extensible markup language) for visual appearence. Xaml help to design beautiful UI by providing the information like what control to place and where to locate and how to locate. The responsibility of xaml is to create to place the control with proper location. for every xaml, there is c# page. this c# page is a class which define behaviour of the page for example what to perform action when button is clicked, to provide data to UI page, etc. Architecture The architecture of the xamarin projects are Xamarin Main project Xamarin.Android Xamar

.NET MAUI Handler

Image
  Before learning.net maui handler you should know about .Net MAUI . Please, support my blog by clicking on our sponsors ad! This is explain in this video In xamarin forms, we are using renderer to customize the controls, this renderers are code in all project to update the property, but now .net MAUI has come with single project so it is providing handler to customize the control, so we are using handler instead of renderer in .net maui. What is Handler and Mappers? Mappers Mappers are a key concept in .NET MAUI handlers, usually providing a property mapper and sometimes a command mapper, which maps the cross-platform control’s API to the native view’s API. This mappers used dictionary to store the data. Handler It is a concept of maping cross platform control to native controls. Each control has an interface, each control that implement interface is called virtual views. Handler map this virtual views to control of each platform control which is known as native views

What is .Net MAUI?

Image
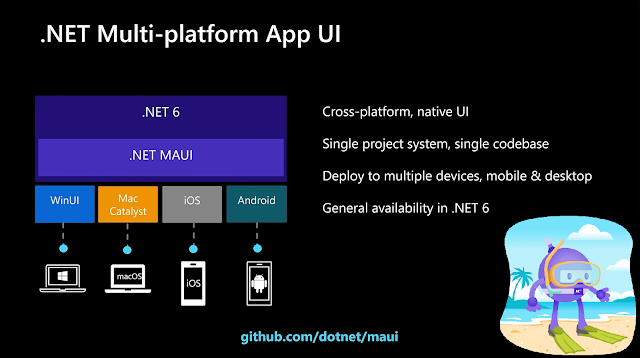
  watch video to understand. Please, support my blog by clicking on our sponsors ad! Let's learn have some basic knowledge about .NET MAUI. Today we look for following: What is .Net MAUI? Difference between Xamarin and .Net MAUI Why Xamarin Obsolete? How to install .Net MAUI? What is .Net MAUI? .Net Maui is a evolution of xamarin forms with better performance and extensibility .Net MAUI is a cross platform framework where you are allow to create mobile apps (IOS,android,window) and also window app and MacOS with single codebase with c# and xaml. It will share UI layout, Code, Test, Buisiness logic. .Net MAUI support Hot reload which allow you to modify source code while app is running. Difference between Xamarin and .Net MAUI? You will notice that there will many similarity in xamarin and .net MAUI like controls,layout,shell,guesture,template,cross platform api. .Net maui is faster than xamarin  .Net maui allow you to develop andoid,ios,macos and window a

Maps in .NET MAUI

Image
  Please, support my blog by clicking on our sponsors ad! .NET MAUI in .NET 7 Release Candidate 1 release on september 20, 2022 .Net MAUI provide map control with the nugget " Microsoft . Maui . Controls . Maps ". his control is ideal for displaying and annotating maps using the native maps from each mobile platform. You can draw shapes on the map, drop pins, add custom pins, and even geocode street addresses, latitude, and longitude. To use the map control, add the NuGet package and initialize the control in your MauiProgram. To initialize the control, add  . UseMauiMaps ()  in your  MauiProgram  builder and then add the  Map  control to your view. <Map x:Name = "map" /> protected override void OnNavigatedTo(NavigatedToEventArgs args) { base.OnNavigatedTo(args); var hanaLoc = new Location(20.7557, -155.9880); MapSpan mapSpan = MapSpan.FromCenterAndRadius(hanaLoc, Distance.FromKilometers(3)); map.MoveToRegion(mapSpan);

Nested Template Using MVVM - Xamarin Form

Image
Nested Template MVVM - Xamarin Form Please, support my blog by clicking on our sponsors ad! Code is explain in this video SkillTemplate.xaml <ContentView xmlns="http://xamarin.com/schemas/2014/forms" xmlns:x="http://schemas.microsoft.com/winfx/2009/xaml" xmlns:vm="clr-namespace:MVVMDemo.ViewModels" x:Class="MVVMDemo.Views.ListTemplate.SkillTemplate"> <ContentView.Content> <StackLayout x:DataType="vm:TechnicalSkill" Padding="0,10"> <Label Text="{Binding Name}" TextColor="Black"/> </StackLayout> </ContentView.Content> </ContentView> EducationTemplate.xaml <ContentView xmlns="http://xamarin.com/schemas/2014/forms" xmlns:x="http://schemas.microsoft.com/winfx/2009/xaml" xmlns:vm="clr-namespace:MVVMDemo.ViewModels" x:C

Login Page - MVVM in xamarin Form

Image
Mvvm in xamarin forms There are three core components in the MVVM pattern: the model, the view, and the view model. Please, support my blog by clicking on our sponsors ad! For more info please refer this microsoft  link . Code is explain in this video We will see mvvm for Login First we will create BaseViewModel.cs BaseViewModel.cs public class BaseViewModel : INotifyPropertyChanged { // public IDataStore<Item> DataStore => DependencyService.Get<IDataStore<Item>>(); bool isBusy = false; public bool IsBusy { get { return isBusy; } set { SetProperty(ref isBusy, value); } } string title = string.Empty; public string Title { get { return title; } set { SetProperty(ref title, value); } } protected bool SetProperty<T>(ref T backingStore, T value, [CallerMemberName] string propertyName = "",