Posts

Showing posts with the label #xaml

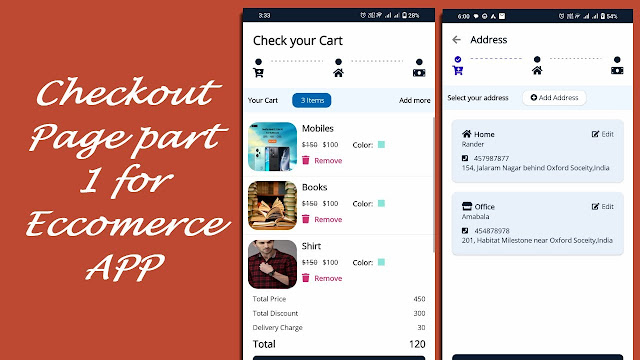
MVVM and MAUI - Checkout page for Ecommerce APP

Image
MVVM and MAUI - Checkout page for Ecommerce APP Please, support my blog by clicking on our sponsors ad! Watch this video to understand code. For fontawesome refer this   link First We will create all template CheckoutStepTemplate.xaml <ContentView xmlns="http://schemas.microsoft.com/dotnet/2021/maui" xmlns:x="http://schemas.microsoft.com/winfx/2009/xaml" x:Class="Ecommerce.UI.Template.Pages.CheckOut.Template.CheckoutStepTemplate" xmlns:fontawesome="clr-namespace:Ecommerce.UI.Template.Models"> <Grid x:Name="grid" ColumnDefinitions="Auto,*,Auto,*,Auto" HorizontalOptions="FillAndExpand" VerticalOptions="FillAndExpand"> <StackLayout Grid.Column="0" Spacing="5" > <Label x:Name="lblCartCircle" Text="{x:Static fontawesome:Solid.Circle}" HorizontalOpt...

XAML Files

Image
 XAML stands for E x tensible A pplication M arkup L anguage. When project is created you can see the maui project structure In this project, there are xaml file(App.xaml,AppShell.xaml,MainPage.xaml) each of this page support xaml language and when you expand it, each will have associated cs file.      In each contentpage of Maui Project, you observe some code at starting of the page xmlns is used for binding namespace. "http://schemas.microsoft.com/dotnet/2021/maui" is an namespace which is version identifier which contain certain information If you remove this line then it will throw error. blue lines says that there is an error. this is because namespace has been removed  The xmlns:x attribute indicates an additional XAML namespace, which maps the XAML language namespace.It define some xaml element. Using x we can use some element like x:class,x:name etc. x:class define the name of the class the use in code behind. Hope this is helpful to you. please ...

Find out how to implement appshell in xamarin forms

Image
Xamarin.Forms 4.0 introduced the amazing feature called Xamarins.Forms Shell. It has reduced complexity of creating mobile apps. Please, support my blog by clicking on our sponsors ad! It is used for Navigation,URI base routing, integrated search handling. Before Appshell there was independent feature: MasterDetailPage TabbedPage NavigationPage but Appshell has combine this and make easy creating apps. > You can add xaml file in your project and named it as AppShell.xaml and Update it like below code: AppShell.Xaml <?xml version="1.0" encoding="utf-8" ?> <Shell xmlns="http://xamarin.com/schemas/2014/forms" xmlns:x="http://schemas.microsoft.com/winfx/2009/xaml" x:Class="XamarinCourse.AppShell"> </Shell> AppShell.Xaml.cs public partial class AppShell : Shell { public AppShell() { InitializeComponent(); } } You can call this class...

Part 8 - Absolute Layout in Xamarin form

Image
 Absolute layout is used to position and size children using explicit values. The position is specified by the upper-left corner of the child relative to the upper-left corner of the AbsoluteLayout, in device independent units.Absolute Layout also implement proportional positioning and sizing feature. Please, support my blog by clicking on our sponsors ad! The Absolute Layout has two properties: LayoutBounds LayoutFlags Layout Bounds The default value is (0,0,Autosize,Autosize). The Parameter is as X,Y,Width,Height. LayoutFlags The default value of this property is AbsoluteLayoutFlags.None. This property indicates that the position and size are interpreted proportionally. Proportional values are from 0-1. 0 indicates 0% and 1 indicates 100%. If you want to use 50% then value will be 0.5 Values are as follow: None This is default value. this is autosize/fixed value. XProportional Indicates that what percentage X of parent should use, while other are absolute value...

Razor Pay using xamarin form (only for Android)

Image
  Razor Pay using xamarin form Please, support my blog by clicking on our sponsors ad! Code is Explain in this video To integrate razor pay in Xamarin, follow below steps: Create account in Razorpay. Create key in Razorpay, later will use for implementing Razorpay gateway in Xamarin form. Create Account in Razorpay. Create account in Razorpay Create account in Razorpay . Create Key in Razorpay. Go to setting in left menu and generate key Generate key in razor pay Generate key in razor pay Now we code in Xamarin to implement Razorpay. Download RazorpayBindingforxamarin.dll  and reference to android project. Razorpay in xamarin form Mainactivity.cs Add Namespace using Com.Razorpay; and declare variable RazorResponseViewModel responseViewModel = new RazorResponseViewModel(); In OnCreate method after LoadApplication(new App()) line add below code: MessagingCenter.Subscribe<RazorResponseViewModel>(this, "PayNow", (payload) => { ...

Scrollable Calendar and Time Control in Xamarin Form

Image
  Scrollable Calendar and Time Control in xamarin form Please, support my blog by clicking on our sponsors ad! In this Blog , we have create control for calendar and time, in which control can scroll using button. In this control can scroll by your finger tips. Lets start with the code: First we will create template for calendar and time control CalendarTemplate.xaml <ContentView xmlns="http://xamarin.com/schemas/2014/forms" xmlns:x="http://schemas.microsoft.com/winfx/2009/xaml" xmlns:vm="clr-namespace:SchoolUIDesigns.ViewModels" x:Class="SchoolUIDesigns.Control.CalendarTemplate"> <ContentView.Content> <Grid RowDefinitions="Auto,Auto" x:DataType="vm:CalendarViewModel" Padding="10,0"> <Label Text="{Binding WeekName}" Grid.Row="0" FontAttributes="Bold" /> <Label Text="{Binding Da...

Push Notification using Firebase in xamarin form (Android and IOS)

Image
Push Notification using Firebase in xamarin form (Android and IOS) Please, support my blog by clicking on our sponsors ad! Watch video to understand the code: https://youtu.be/1Ixc_B86mDk Follow steps to create push notification in both project. Create Project in  https://console.firebase.google.com/ Create Project for push notification After Creating Project add app for both IOS and Android Project. Create app in project For Both IOS and Android project add Package name. Package name should be same as your package name in Xamarin Android and IOS Project. Click on Register App Download Google Service json. If you are in android app then download google-services.json else if you are in ios app then download "GoogleService-Info.plist" file Click Next then click Next then Click Continue to console button. We have created project in firebase console now we will continue coding in xamarin. In Android Project add Internet Permission. Right click on android project -> ...