Posts

Showing posts with the label #.net

Upload Image in Xamarin Form

Image
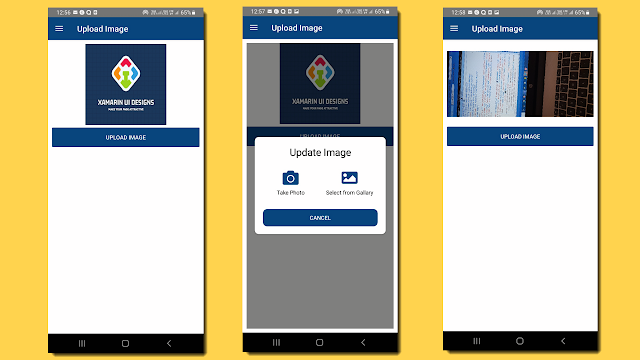
  Upload image in xamarin form   Get fontawesome code from   here First we will add control. ChoosePhotoControl.Xaml <ContentView xmlns="http://xamarin.com/schemas/2014/forms" xmlns:x="http://schemas.microsoft.com/winfx/2009/xaml" x:Class="SchoolUIDesigns.Control.ChoosePhotoControl"> <ContentView.Content> <Grid RowDefinitions="Auto,Auto" ColumnDefinitions="Auto"> <Label x:Name="lblFontawesomeText" FontFamily="{StaticResource FontAwesomeSolid}" FontSize="40" HorizontalOptions="Center" Grid.Row="0" TextColor="#08457E"></Label> <Label x:Name="lblText" TextColor="Black" Grid.Row="1" HorizontalOptions="Center" FontSize="14"></Label> </Grid> </ContentView.Content> </ContentView> ChoosePhotoControl.x

Textbox, Button, Combobox Design in xamarin form

Image
  Textbox,Button, Combobox Design in xamarin form First we will create template get fontawesome code from  here Copy code for CustomEntry from  this link . Code is explain in this video Add " PancakeView " nugget in your project. CustomTextbox.xaml <ContentView xmlns="http://xamarin.com/schemas/2014/forms" xmlns:x="http://schemas.microsoft.com/winfx/2009/xaml" xmlns:pcview="clr-namespace:Xamarin.Forms.PancakeView;assembly=Xamarin.Forms.PancakeView" xmlns:control="clr-namespace:LoginUIDesigns.Controls" x:Class="LoginUIDesigns.Controls.CustomTextbox"> <ContentView.Content> <StackLayout> <pcview:PancakeView x:Name="pc" CornerRadius="40,0,0,40" HeightRequest="55" BackgroundColor="White" Padding="10,0"> <

Payment UI Design using xamarin form

Image
  Payment UI Design using xamarin form Add following code in App.xaml in Resource Dictionary tag get fontawesome code from here Watch video  to understand code       <Color x:Key="Primary">#3AC3D6</Color>             <Color x:Key="Secondary">#FFFFFF</Color>             <Color x:Key="TextColorGray">#333333</Color>             <Color x:Key="SeparatorColor">#E8E8E9</Color>             <Color x:Key="BGColor">#FFFCF7</Color>             <Style TargetType="Label" x:Key="PoppinsBoldLabel">                 <Setter Property="FontFamily" Value="Helvetica"></Setter>                 <Setter Property="FontAttributes" Value="Bold"></Setter>                 <Setter Property="TextColor" Value="{x:DynamicResource TextColorGray}"></Setter>             </Style>          

Dashboard similar as Amazon Dashboard

Image
  Dashboard in xamarin form You can get fontawesome from this link . First we will create custom navigation bar TopNavBar.xaml <ContentView xmlns="http://xamarin.com/schemas/2014/forms" xmlns:x="http://schemas.microsoft.com/winfx/2009/xaml" x:Class="EShoppingUIDesigns.Controls.TopNavBar" xmlns:fontawesome="clr-namespace:EShoppingUIDesigns" BackgroundColor="#3AC3D6"> <ContentView.Content> <Grid HorizontalOptions="FillAndExpand" RowDefinitions="Auto,Auto" RowSpacing="20" ColumnDefinitions="Auto,*,Auto" Padding="10"> <Image Grid.Row="0" Grid.Column="0" Source="threelines.png" Aspect="AspectFill" HeightRequest="20" WidthRequest="25"></Image> <Label Grid.Row="0" Grid.Column="1" Margin="10,0,

Hotel UI Design using Xamarin Form

Image
  Hotel UI Design using xamarin form About UI Design is for Hotel using xamarin form. There are three forms. List of Places Hotel list of selected place, you can filter and search Third page is detail of selected hotel. Lets begin with code: Copy code for Font awesome from this link . Copy code for CustomEntry from this link . Please watch video  to understand this code. Create Property classes for Hotel and Places. HotelViewModel public class HotelViewModel { public string Name { get; set; } public string Price { get; set; } public string Address { get; set; } public string Days { get; set; } public string Distance { get; set; } public ImageSource Img { get; set; } } public class HotelModel { public List<HotelViewModel> Get() { List<HotelViewModel> list = new List<HotelViewModel>(); list.Add(new HotelViewModel { Img = "https://encrypted-tbn0.gstatic.com/

School UI Design using Xamarin form

Image
 In Previous blog we have seen some design for school app, so today I am continue with same app School UI Design using Xamarin form All Part of School UI Design: https://xamarinuidesigns.blogspot.com/2022/03/school-ui-design-using-xamarin-form.html https://xamarinuidesigns.blogspot.com/2022/03/school-ui-design-using-xamarin-form_4.html https://xamarinuidesigns.blogspot.com/2022/03/school-ui-design-using-xamarin-form_10.html https://xamarinuidesigns.blogspot.com/2022/03/school-ui-design-fees-gallery-profile.html Today we are going to learn three page: Examination, Assignment, My Attendance Lets start with create classes for all three pages. Install nugget "XamForms.Controls.Calendar" in all the project. ExaminationViewModel.cs public class ExaminationViewModel { public string Name { get; set; } public string Date { get; set; } } public class ExaminationModel { public List<ExaminationViewModel> Get() { Lis