Posts

Showing posts with the label #.net

Create PopUp in .Net MAUI

Image
Popup in .net Maui Please, support my blog by clicking on our sponsors ad! Popups are an integral part of user interface design, allowing developers to convey information and interact with users in a more engaging manner. In .NET MAUI, there are three main types of popups available: DisplayAlert, DisplayPrompt, and Plugin.Maui.Popup. In this blog post, we will dive into each of these popup types, explore their functionalities, and provide code examples to demonstrate their usage. DisplayAlert: Simple and Informative Popups DisplayAlert is a built-in feature in .NET MAUI that provides a straightforward way to display alert popups to users. These popups typically present important messages, notifications, or warnings that require user acknowledgement. Here's an example of how to use DisplayAlert in your .NET MAUI application: DisplayAlert("Display Alert", "Welcome to DotNet Maui", "OK","Cancel",FlowDirection.RightToLeft); In the co

Introduction to .NET MAUI: Building Cross-Platform Applications with .NET and C#

Image
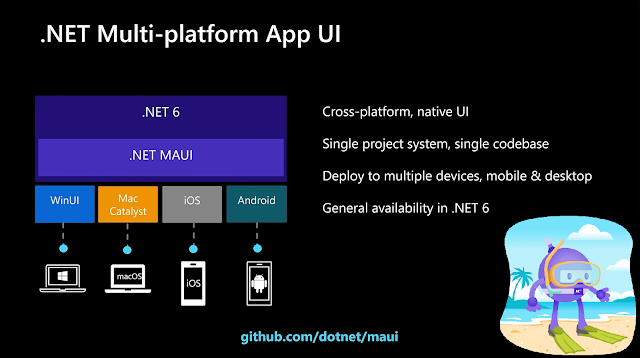
 .NET MAUI stands for .NET Multi-platform App UI, which is a UI framework that allows developers to create cross-platform applications for iOS, Android, Windows, and macOS using .NET and C# programming language. It is an evolution of the Xamarin.Forms framework and is built on top of .NET 6 Introduction: In today's world, businesses need to create applications that run on multiple platforms to reach a wider audience. However, building applications for different platforms can be a time-consuming and complicated process. This is where .NET MAUI comes in. .NET MAUI allows developers to create cross-platform applications for iOS, Android, Windows, and macOS using .NET and C# programming language. What is .NET MAUI? .NET MAUI is a UI framework that enables developers to create cross-platform applications using a single codebase. It is built on top of .NET 6 and is an evolution of the Xamarin.Forms framework. With .NET MAUI, developers can create native applications that run on multiple

Xamarin Tutorial Part 6 - Grid in code

Image
 Before you start with this blog, go to this syntax and tutorial blog. It will easy to understand the code of this blog. Grid through cs code Grid in xaml Please, support my blog by clicking on our sponsors ad! Below code for grid in c# Code. This is recommended when it has to add at runtime. By default you can add grid through xaml, Because xaml is easy to code and understand. var grid = new Grid(); var autoRow = new RowDefinition() { Height = new GridLength(1, GridUnitType.Auto) }; var fixRow = new RowDefinition() { Height = new GridLength(200) }; var starRow = new RowDefinition() { Height = new GridLength(1, GridUnitType.Star) }; var col1 = new ColumnDefinition() { Width = new GridLength(1, GridUnitType.Star) }; var col2 = new ColumnDefinition() { Width = new GridLength(1, GridUnitType.Star) }; var col3 = new ColumnDefinition() { Width = new GridLength(1, GridUnitType.Star) }; var col4 = new ColumnDefinition() { Width = new GridLength(

Xamarin Tutorial Part 4 - Grid for Xamarin Forms

 What is Grid? with live example please watch: https://youtu.be/gZQyqKheUF4 https://youtu.be/e8cYsSw752s Please, support my blog by clicking on our sponsors ad! Grid is a layout type that allow you to create design using rows/columns Let's see how to use Grid Use Grid tag to create design <Grid></Grid> In C# var grid = new Grid() There are three type of cell size 1) Absolute : Fix size <Grid ColumnDefinition = "50,70,80" /> There will be three Column cell  1st row cell width will be 50  2nd cell width will be70  3rd cell width will be 80 2)  Auto: Will use size of data <Grid ColumnDefinition = "70,70,Auto"/> There will be three Column cell  1st row cell width will be 70  2nd cell width will be70  3rd cell width will be according to data 3) Star: It expand propotionally to space size <Grid ColumnDifinition="*,2*,5*"/> 2* = 20%,  5* = 50%,  100-70 = 30 so * = 30% There will be three Column cell  1st row c

.NET MAUI Handler

Image
  Before learning.net maui handler you should know about .Net MAUI . Please, support my blog by clicking on our sponsors ad! This is explain in this video In xamarin forms, we are using renderer to customize the controls, this renderers are code in all project to update the property, but now .net MAUI has come with single project so it is providing handler to customize the control, so we are using handler instead of renderer in .net maui. What is Handler and Mappers? Mappers Mappers are a key concept in .NET MAUI handlers, usually providing a property mapper and sometimes a command mapper, which maps the cross-platform control’s API to the native view’s API. This mappers used dictionary to store the data. Handler It is a concept of maping cross platform control to native controls. Each control has an interface, each control that implement interface is called virtual views. Handler map this virtual views to control of each platform control which is known as native views

What is .Net MAUI?

Image
  watch video to understand. Please, support my blog by clicking on our sponsors ad! Let's learn have some basic knowledge about .NET MAUI. Today we look for following: What is .Net MAUI? Difference between Xamarin and .Net MAUI Why Xamarin Obsolete? How to install .Net MAUI? What is .Net MAUI? .Net Maui is a evolution of xamarin forms with better performance and extensibility .Net MAUI is a cross platform framework where you are allow to create mobile apps (IOS,android,window) and also window app and MacOS with single codebase with c# and xaml. It will share UI layout, Code, Test, Buisiness logic. .Net MAUI support Hot reload which allow you to modify source code while app is running. Difference between Xamarin and .Net MAUI? You will notice that there will many similarity in xamarin and .net MAUI like controls,layout,shell,guesture,template,cross platform api. .Net maui is faster than xamarin  .Net maui allow you to develop andoid,ios,macos and window a

Nested Template Using MVVM - Xamarin Form

Image
Nested Template MVVM - Xamarin Form Please, support my blog by clicking on our sponsors ad! Code is explain in this video SkillTemplate.xaml <ContentView xmlns="http://xamarin.com/schemas/2014/forms" xmlns:x="http://schemas.microsoft.com/winfx/2009/xaml" xmlns:vm="clr-namespace:MVVMDemo.ViewModels" x:Class="MVVMDemo.Views.ListTemplate.SkillTemplate"> <ContentView.Content> <StackLayout x:DataType="vm:TechnicalSkill" Padding="0,10"> <Label Text="{Binding Name}" TextColor="Black"/> </StackLayout> </ContentView.Content> </ContentView> EducationTemplate.xaml <ContentView xmlns="http://xamarin.com/schemas/2014/forms" xmlns:x="http://schemas.microsoft.com/winfx/2009/xaml" xmlns:vm="clr-namespace:MVVMDemo.ViewModels" x:C

Push Notification using Firebase in xamarin form (Android and IOS)

Image
Push Notification using Firebase in xamarin form (Android and IOS) Please, support my blog by clicking on our sponsors ad! Watch video to understand the code: https://youtu.be/1Ixc_B86mDk Follow steps to create push notification in both project. Create Project in  https://console.firebase.google.com/ Create Project for push notification After Creating Project add app for both IOS and Android Project. Create app in project For Both IOS and Android project add Package name. Package name should be same as your package name in Xamarin Android and IOS Project. Click on Register App Download Google Service json. If you are in android app then download google-services.json else if you are in ios app then download "GoogleService-Info.plist" file Click Next then click Next then Click Continue to console button. We have created project in firebase console now we will continue coding in xamarin. In Android Project add Internet Permission. Right click on android project ->